Tuesday, May 30, 2017

I Need A Maid

Hey guys, today I am taking a bit of a break to do something that I dread...CLEANING. I have a bad habit when I am crafting of pulling out a lot of supplies to use and then they don't quite make it back to their homes. They end up sitting around on my desk, side table or even the guest bed (since my craft room also doubles as the guest bedroom) until either company is coming and I am forced to make the room livable or things start to fall off because there is nowhere left to sit stuff. So my goal is to take the rest of this week and simply work on putting stuff away and making my craft room manageable again.

I thought that I would share some pictures of the clutter so that you can see the mess that I am dealing with. Let's call this the BEFORE pictures and by next Tuesday I will hopefully be able to present you with some great clean AFTERs.

Here is a photo of what my desk currently looks like:

 This is the table that sits to the left of me when I craft:


 And finally here is a pic of the guest bed that I share space with, as you can tell it is unmade (the sheets are there they just haven't actually made it back onto the bed since they were washed) and it is loaded down with finished projects, my Cricut machines and some camera equipment.


These picture only showcase a few of the areas of mess that I am currently working on, the other areas will be put off for a while longer because if I attempt to do it all now I will probably go INSANE.

Friday, May 26, 2017

News and Confetti

Happy Friday! May has been an event filled month, I feel like I barely get to finish one project before another one is looming on the horizon. I definitely had a love/hate relationship with the month. I LOVED having things to do and projects to accomplish but I HATED when I would get into a rhythm my body would crap out on me, from headaches to severe back aches that made it difficult to sit upright. Depressive moments that made it difficult to get out of bed to major anxiety attacks that convinced me that I am a no talent loser who should just quit any project before I start. It has definitely been a month of ups and downs but in the end I am still pushing through! I managed to get all of my May projects done and I have even gotten a head start on some of my June stuff.

Now that I have got the emotional stuff out of the way let’s get to talking about today’s card, which is a birthday card that I made for my aunt Paula whose birthday is tomorrow. Since I will be hand delivering this card I decided to just have fun and make a card that once again breaks my sizing mold. I recently bought a new paper pad from Michael's that has some cut aparts that I instantly wanted to turn into these shaker cards to fit with the confetti theme. Then final card measures 3.25 x 6.5 inches and will fit nicely in a 5 x 7 envelope. 


Tuesday, May 23, 2017

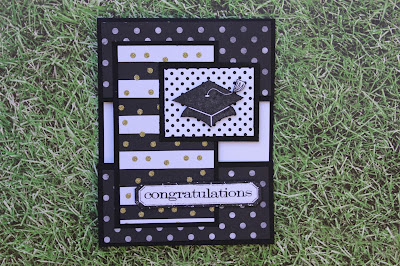
Pinterest Graduation Card

It is that time of year again for Graduations. Whether it is an adorable little 5 year old like my niece who is graduating from Kindergarten into 'Big Kid School' or the son of someone you work with who is graduating from High School. Graduation is a time for celebration and fun. This amazing card that I found on Pinterest is perfect for either occasion. By making a few simple changes to the colors or the papers that are used, the card can easily be customize to any graduate. 


Friday, May 19, 2017

Magical Unicorn Birthday

Hey hey, it's Friday! I hope you all had a good week and have an even better weekend planned. Last Sunday (May 14 aka Mother's Day) was my best friend Heather's birthday and each year I try to make her a fun whimsical style card. Something to make her smile. So, when I saw this ADORABLE unicorn stamp set I knew I just had to have it to make her a card. Because, let’s face it what is more whimsical and magical than UNICORNS? I hope that you all like it just as much as I do.


Tuesday, May 16, 2017

Same Design, Different Sentiment

Hey everyone, I hope that you all had a great Mother's Days! Mine was wonderful, I got to spend it with my amazing mom and aunt. We had lunch together and then did some shopping and topped it off with a trip to get some delicious ice cream. I am truly blessed to have such an amazing mom!
Today, I thought that I would share with you some cards that I made using the same design. But, by changing the focal image or sentiment each card turned out looking slightly different. There were a couple of things that inspired me to do this set of cards. The first, I found a great sketch (from cardztv.blogspot.com) that would make it easier to make multiple cards at the same time. The second reason, is that I have way too much patterned paper!

Anyway enough with the talk let’s get to the pictures: 


Friday, May 12, 2017

Mother's Day Floral Framed Card

Hey guys, Mother's Day is just around the corner so I thought that I would share the card that I plan to give to my own AMAZING mother so hopefully she doesn't check out my blog in the next few days, because if she does she is going to see her Mother's Day card early.
While on YouTube this past week I came across several people talking about how to get the most out of your stamps by stamping them onto a patterned paper instead of just a solid color. I love this idea and it can add so much color and interest to any project. So, I grabbed several sheets of patterned paper and started stamping. I love how it all turned out, with the solid black line from the stamp over the color design pattern, each flower looked completely different even when stamped on the same patterned paper.


Just like I did with last week’s card, I choose to add the same stamped designs onto the inside of the card. Only, this time I decided to color in each flower to give it a bolder, more vibrant look. I love how this card turned out and I hope that my mom will too. 

Tuesday, May 9, 2017

Mother's Day Stamped Layer Card

I made this beautiful card with a new stamp set that I got. One of the newest trends in stamping and card making is layering stamps; stamp sets that are created with images that when stamped with different colors layer on top of one another to give a more realistic look to an otherwise flat image. So by layering several different shades of pink together these gorgeous flowers appear to be almost 3 dimensional. This card could easily be used for any occasion by simply changing out the sentiments and/or colors to fit the recipient and the occasion.


For the inside I used the same stamps that I used on the front but chose not to layer them, so that it gives a cohesive look without being too heavy and still leaves enough space to write a message.

Friday, May 5, 2017

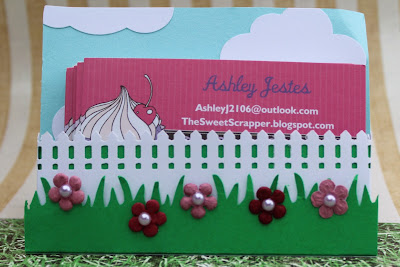
Desktop Business Card Holder

Last Friday I shared that my new business cards had arrived (and I am still completely in LOVE with them) and I showed you the new flip book style case I made to carry them in my purse. Well this week I realized that I should probably keep some on top of my desk. While browsing through Pinterest I ran across several different easel style desktop business card holders and thought that that style might be nice.  I went to bed that night still thinking on it and I actually had a dream of a how I wanted to create my easel holder. So, just seconds after I woke up I jumped out of bed and started gathering the supplies that I would need.


I love this adorable little garden scene and it is perfect for a spot on my window sill that is right above my desk. It measures 4.25 inches across, so it doesn't take up much room on a desk (or window sill) and the box that the business cards sit in is about half an inch wide so it can comfortably hold 25 business cards.  

Tuesday, May 2, 2017

Square Thank You Card

Hey guys, today’s card is one that I made a while ago and I am finally getting around to blogging it. Most of the cards that I make are all the same size- 4.25" x 5.5' (also known as an A2 card). This size is standard for most homemade cards in the USA, and only costs standard postage to mail. Other sizes or shapes tend to cost more postage. But, every now and then I will break the mold and make something different, such as this glitzy square Thank You card (which measures 5.25" x 5.25"). I added a lot of sparkly rhinestones to the rather simple card in order to (as Chef Emeril Lagasse would say) kick it up a notch. I left the inside blank, as I do with most of my thank you cards, so that there is plenty of room to write your message.