Friday, January 8, 2016

Happy Friday

Hey guys, I hope you all have had a great Friday. Today completes the first week in my crafting resolution series, and I'm super shocked that I managed to actually stick with it. Now, most of you are probably thinking a week is not that hard, but since the weight loss/ diet resolution that I set for myself hasn't managed to make it past six hours I am going to celebrate this small victory!

Every year, in June, my mom's side of the family has a family reunion. So to kick off this first Friday scrapbook day I thought I would create a double page layout (with room for four 4 x 4 photos and one 4 x 6 ) to showcase some photos from this past year. 
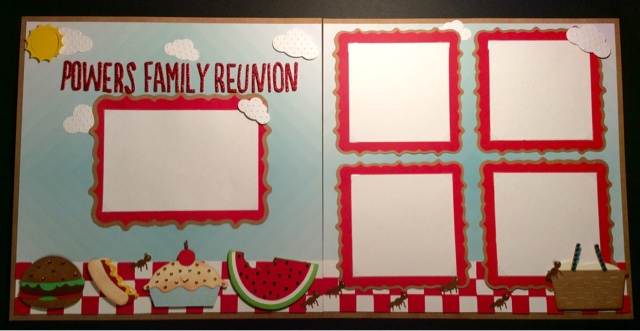


For this layout I used 4 Cricut cartridges, 2 punches, 1 cuttlbug folder, 1 die, some thickers and lots of rhinestones. 

So let's break it down one side at a time. 


Let's start with the left-hand side. The sun in the upper left corner was it die from quick kutz and the clouds came from two different sized Fiskars punches (that I ran through the Cuddlebug Swiss Dots embossing folder). All the food at the bottom was cut from the Simply Charmed cartridge (hamburger – 2", hot dog – 1.5", pie – 2.5" and watermelon – 2") and the photo frame is from the Elegant Edges cartridge (the oblong burst cut at 6.75"). That fancy looking tablecloth (we do it up right here in the Midwest lol) was found on the Family Album cartridge. Now let me give you a tip so that you don't experience the same frustration I did the first 4 times I tried to cut the checkerboard pattern. The maximum size it will cut is 2 inches, but if you set the dial on an older machine (older than the explore) to 2 inches it will give you an error telling you it cannot cut because it is to big. There is a way around this, you MUST select the fit to page button and it will calculate to cut at 2 inches. (By the way, if you try to use the fit to length feature set at 11.75", it will give you an error). I cut a piece of white card stock to 2" x 11.75" in order to put behind the checkerboard piece, and added two of the pieces left over from the die-cut to the ends in order to get the full length. Gosh, I hope that made since. 

For the title I used some Thickers from American Crafts in the font called Journal. Sidenote, why is it that you buy more and more Thickers (especially if they're cheap like they are at Tuesday Morning) because you don't have one to fit your project but then when you go to use them you realize you have too many to make a decision on Color or style to use. Does anyone else have this problem?

Lastly, I added different colored rhinestones to several of the foods (mostly to cover up the fact that some of them have a face when cut) which gives them a little sparkle and makes them stand out.

Now that we have covered the left side let's start with the right. 


This side may look simple but it was actually most time-consuming part of the entire layout, all because of those stupid little ants. The frames once again are from the Elegant Edges cartridge (square burst cut at 5") and the tablecloth border is the same as the other side. I found the picnic basket on the Family Album cartridge (same page as the checkerboard piece and cut it at 2.5") 

Now for those pesky little Ants, they were found on the Kate's ABCs and cut at 1.75" (I used a white Jelly Roll pen to add a dot for the eye), the hardest part was getting them to cut cleanly without ripping. The key to success is a very sticky mat and a sharp blade, otherwise be prepared to be annoyed and waste a lot of time and paper. For me, I felt the layout would have been to plain without them so I put up with the annoyance and gave it a try. I must've cut at least 30 but only these seven managed to survive. 


Wednesday, January 6, 2016

Valentines Shaker

With Valentine's Day only a month away I need to get started on some cards. For today's card I was inspired by a post I found on Pinterest. 


I used some patterned paper from an old Recollections 6 x 6 paper pad called With Love cut to 4" x 5.25". I made the "Polaroid" shaker out of a piece of white card stock that measured 2.75" by 3.5". I measured 1 inch from the bottom and 3/8 of an inch from the other three sides and cut out the middle using a craft knife. (See picture below) 


I adhered a piece of transparency to the backside of the "Polaroid" and surrounded the frame with foam tape, making sure that there were no gaps in the tape for the shaker hearts to fall out. 
The hearts were actually the negatives from the Lace Hearts punch by Martha Stewart. I cut them from red, light pink, dark pink and white card stocks. 
I cut a piece of red card stock that measure 2.75" by 3.5" and adhered it to the back of the shaker before attaching the entire thing to the pattern paper using double-sided tape. 
The 'love ya' sentiment was from a paper smooches stamp set called Scripty Sayings. 

I kept the inside of the card simple by just using a piece of 4" x 5.25" White card stock and stamping it with a Happy Valentine's Day sentiment from Stampabilities. The hearts came from the same paper smooches stamp set as "love ya". And, all the stamping was done using memento love letter ink.

Monday, January 4, 2016

Christmas Cards Post 1

Well I have now managed to post 2 days this year only about 150 some to go.

As promised today's post will be about some of the cards that I made for Christmas, sine I made about 25 of them I'm going to split them up into several different posts.

Today's post is going to focus on the cards I made using cut apart elements.


Friday, January 1, 2016

Happy New Year!

Hey guys, sorry that it has been so long since my last post. There really is no excuse except that I had some computer problems and was unable to post frequently.

But, one of my resolutions for the new year is to post frequently here on my blog. So here is the plan: I will try my hardest to post 3 times a week for the entire year. On Mondays I will post about project that I have made in the past year. Wednesdays will be new cards that I create this year and finally Friday's will be a scrapbook layout.

Wish me luck and I will see you on Monday with some picture of some Christmas cards that I made this year.

Tuesday, September 9, 2014

Grandpa gets HONORED

Today my grandpa got the opportunity to go on an Honor Flight. The Honor Flight is for World War II Veterans as well as Korean War Veterans and Vietnam War Veterans, they get the chance to fly up to Washington D.C. to visit all of the memorials (WWII, Korean, Vietnam, Iwo Jima, Lincoln.) They also get to see the changing of the guard at Arlington National Cemetery.
 
Family members, friends and acquaintances of the honored veteran are asked to write letters to them ahead of time and then they are given to the veteran just before the return flight home; this is done to mimic "mail call" that the veterans got while serving for our country. 
 
Below is the card that I made for my grandpa who is a World War II Veteran.
 
 
My Hero was cut with the Cricut Stand and Salute Cartridge and layered on top of a frame cut from a spellbinders die (labels ?)
The papers came from a 8.5 X 11 paper pad I got at Walmart a year or so ago. 
The inside is not pictured, I only used a white mat so that I had plenty of room to write a letter inside.
 
 
As the Veterans arrived back in town, family and friends are encouraged to come to the airport to welcome them home in style. There will be a band, ROTC students, news media and more there to welcome them home as well.
 
My mom and I worked together to make a couple of banners to hold up in honor of our hero, my grandpa.


Monday, September 1, 2014

Happy Birthday Aunt Carla

I wanted to make a fun and colorful card to celebrate my Aunt Carla's Birthday so I reached for one of my newer cartridges that I got for Christmas, Cricut Pack Your Bags. This cartridge is full of great images for summer, vacations and beachy related things.
 
The card base is a standard 4.25" x 5.5" card with the blue polka dotted paper measuring 4" x 5.25"
The postage stamps were cut from page 55. 3 were cut out of Kraft cardstock at 2" and 3 out of a patterned cardstock at 1.75"
Drink 1 is also found on page 55 and all layers were cut at 1.5"
Drink 2 is found on page 69 and all layers were cut at 1.5"
Drink 3 is found on page 70 and all layers were cut at 1.5"
Each of the drinks were adhered flat to the postage stamp and then the stamps are popped up on foam tape.
For the bottom I freehand cut a curved shape out of some kraft cardstock using scissors and punched a wave out of blue cardstock using the Fiskars Wave punch.
To finish off the card I stamped my sentiment in the bottom right and attached some seashell stickers that I had in my stash.

 
For the inside I simply stamped a sentiment and then added 2 strips of paper that match what was used on the front of the card. The blue polka dot strip is 1" and the multicolored strip is .75" The flip flops are stickers that came from the same set as the seashells used on the front.


Monday, August 25, 2014

Welcome baby Noah

Yesterday my cousin gave birth to a beautiful baby boy named Noah. Both mother and baby are happy and healthy and we are all so glad that Noah is finally here.
 
 
Below is the card that I made for my cousins baby shower back in June.


To make this card I cut 2 dark blue onesies from the Cricut Life is a Party Cartridge (pg. 29) on the BASE layer, and then using the BASE SHIFT I cut one layer in white and 2 in light blue .
 
I adhered the white layer to one of the dark blue pieces and then glued only the top edges (the shoulder pieces) together with the other blue piece to make a flip up card.
 
I ran the light blue piece through my swiss dots cuttlebug folder and adhered it to the front of the card.
 
I chose to use another image on the front of the onesie instead of the duck that cuts out with it. I found the boat on the Baby Steps Cartridge (pg. 55) and I only cut the Layer 1 pieces.
 
I then added 3 small buttons (from favorite findings) to the bottom for a more finished look.
 
On the inside I cut the remaining light blue onesie so that only a 'diaper' shape was left and added 2 pieces of washie tape to either side in a coordinating color. I placed so foam take along the sides and bottom of the 'diaper' piece so that a gift card would slide into the pocket.